How to Burn a Slideshow to DVD
Are you looking to make a DVD of your slideshow? Look no further! This article will teach you how to burn a slideshow to a DVD quickly and easily.
You can create amazing slideshows with photos, text, and music. And, with the right tools, you'll have the capacity to burn them to a DVD so that you can watch the videos on any DVD player or computer.
We'll walk you through the process step by step. You'll learn how to select the photos for your slideshow, add music and effects, create a slideshow and then burn it all to a DVD. So let's get started!

How we picked tools to burn a slideshow to a DVD
Here are the criteria we used when choosing DVD-burning software:
- User-friendly interface. We opted for tools with an intuitive interface, making it easy for users with different skill levels to navigate and use the software effectively.
- Output quality. We chose options that maintain the original clarity during the burning process, minimizing the loss of quality.
- Editing capabilities. We looked for tools that offer basic editing features such as adding transitions, text, or audio to your slideshow.
Why burn a slideshow to DVD?
While burning a slideshow to DVD may seem like an outdated method compared to digital distribution channels, it offers several advantages, especially in certain contexts:
- Portability. DVDs allow you to keep your presentation in a portable format as they can be played on DVD players, computers, and even some gaming consoles without the need for internet access or specific software.
- Gifts and keepsakes. Burning a slideshow to DVD can turn it into a tangible and sentimental gift or keepsake. Whether it's a compilation of family photos for a special occasion, a retrospective of a memorable event, or a collection of professional images for clients, a DVD adds a personal touch and can be cherished for years to come.
- Professional presentation. In some professional settings, such as business meetings, conferences, or trade shows, DVDs can still be a preferred format for presenting slideshows or multimedia content. They offer a reliable and familiar means of sharing information without the need for internet connectivity or relying on potentially unreliable projection equipment.
- Permanent storage. Unlike digital files that may be accidentally deleted from your device or online storage, DVDs provide a physical and relatively stable storage medium. This ensures that your slideshow remains accessible and preserved for future viewing, even if digital copies are lost or damaged.
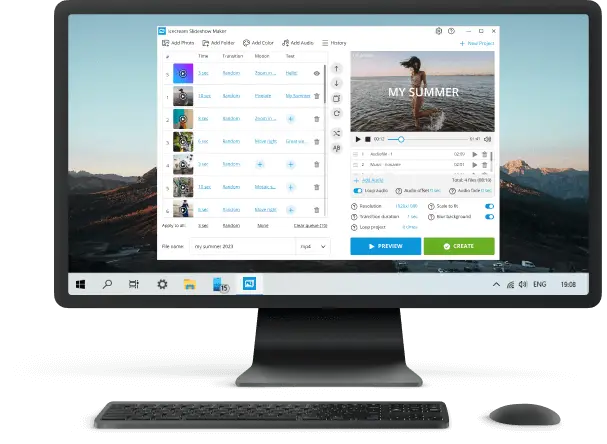
Option 1. Icecream Slideshow Maker
Icecream Slideshow Maker is a software designed to create video slideshows from images with audio. It allows users to compile photos with various transition effects and background music. Plus, it has a built-in feature to burn slideshows to a DVD.
Step-by-step guide:
- Visit the official website, download the free slideshow maker for Windows, and install it on your computer.
- Import the images you want to include in your slideshow. Arrange them in the desired order.
- Customize slideshow settings, such as transition effects, slide duration, and background music if desired.
- Preview the video to ensure everything looks as expected and click "Create".
- Once the slideshow is processed, you will see the "Burn CD/DVD" option. Click it to burn a slideshow to DVD.


Pros:
- User-friendly interface. The intuitive interface makes it accessible for users with varying levels of technical expertise.
- All-in-one program. The slideshow maker integrates both slideshow creation and DVD-burning features. It provides a streamlined and convenient solution for users who want simplicity.
- Transitions and effects. The program offers a range of built-in transitions, effects, and other customization options for your slideshow.
- Background music. Users can create slideshows with music to make it more interesting for the audience.
- Compatibility. The format used for burning is compatible with standard DVD players, ensuring wider playback options.
Option 2. Windows Movie Maker
Making a DVD slideshow using Windows Movie Maker is a great way to show your photos and videos and make a slideshow. It's an easy and efficient way to create a presentation of your memories.
Step-by-step guide:
- Open the Movie Maker. Select the "Create New Project" option.
- Hit "Add clip" and "Photo/Video". Add the images or videos you wish to incorporate into your slideshow.
- Arrange the photos and videos in the order you'd like them to appear in the slideshow. Add transitions, effects, and titles as desired.
- Click the "Save video" button and export the slideshow.
- Go back to the main menu, choose "Create DVD" and install the software from Microsoft Store.
- Press "Create DVD from video files" and select the slideshow you've just created.
- Tap "Burn DVD", pick the name for the file, and click "OK".


Pros:
- Free slideshow maker. The free slideshow maker is available for free and comes pre-installed on earlier Windows operating systems.
- Basic editing features. The program provides essential video editing tools for creating simple slideshows, including options for adding transitions, effects, and background music.
- Export options. Users can export finished projects in common video formats (WMV, MP4), which could then be used with other DVD authoring software.
Cons:
- Discontinued. Windows Movie Maker has been officially discontinued by Microsoft, which means no more updates or official support.
- Complicated DVD burning. The slideshow creator doesn't have a built-in DVD burner. You need to save the slideshow as a video from photos and then use a separate DVD authoring tool.
- Price. Although you can use a slideshow maker for free, you will have to pay to burn these slideshows to DVD.
Option 3. Microsoft PowerPoint
Using Microsoft PowerPoint is an easy and fast way to create DVD slideshows to share with others. It is part of the Microsoft Office suite, which includes applications like Word, Excel, and Outlook.
Step-by-step guide:
- Create or open your presentation in PowerPoint.
- Go to the "File" menu and select "Export".
- Click "Package Presentation for CD" and type a name for the file.
- Insert a blank DVD into your computer's DVD drive and click "Copy to CD" to start burning.
- Upon completion, you can eject the disk from your computer and play it in a standard DVD player or other device.


Pros:
- Familiarity. The slideshow creator is widely used and familiar to many people, making it accessible for creating slideshows.
- Multimedia options. Users can add various multimedia elements, including images, videos, and audio, enhancing the visual appeal of the slideshow.
- OS support. You can make DVD slideshows on both Windows and macOS computers.
Cons:
- Compatibility. Some older DVD players may not support the format used for burning your slideshows with this presentation software.
FAQ
- What type of files can I transfer to DVD?
- To transfer a slideshow to a DVD, you'll typically require a suitable video file format, such as AVI or MP4. These formats ensure smooth playback on DVD players and compatibility with burning software.
- Can I use any DVD type, or are there specific requirements?
- When choosing a DVD type, it's essential to consider your DVD burner's specifications. Common types include DVD-R and DVD+R but double-check compatibility with your burner to avoid potential playback issues.
- Can I combine multiple slideshows onto a single DVD?
- Yes, it's often possible to include multiple slideshows on a single DVD, provided there's enough space on the disc. The number of slideshows you can add depends on their individual lengths and the quality settings chosen during the burning process.
- Can I watch my slideshows on any TV or computer?
- Absolutely, once burned onto a disc, your slideshows can be viewed on any device equipped with a DVD drive or DVD player. This includes computers, laptops, and TVs, offering versatile playback options for your audience.
- Do I need to create a DVD menu for my slideshow?
- While not mandatory, creating a DVD menu for your slideshow can significantly enhance the user experience. Many specialized DVD authoring software tools provide easy-to-use features for designing interactive menus that allow viewers to navigate between slideshows seamlessly.
- What is the maximum duration of a DVD slideshow?
- The length of a slideshow is determined by the format of the DVD and the storage capacity of the disc. Typically, a standard single-layer DVD can accommodate up to 2 hours of video content, while dual-layer DVDs offer extended capacity.
- What should I do if my DVD-burning process fails or encounters errors?
- If you experience failures during the DVD burning process, there are several troubleshooting steps you can take. Firstly, ensure that your burning software is up to date and that you've selected the appropriate settings for your project. If issues persist, try reducing the burning speed or using a different brand of blank DVD to improve compatibility.
- Can I make copies of my DVD slideshow for distribution, and are there any legal considerations?
- While you're generally permitted to make copies of your DVD slideshow for personal use, distributing copies for commercial purposes requires legal consideration. Ensure that you have the necessary rights to the content included in your slideshow, and seek permission from copyright holders if needed before distributing copies for profit or public display.
Conclusion
While digital technology continues to advance, making a DVD slideshow remains a valuable option for preserving memories, sharing content, and ensuring accessibility across various platforms. It's easy and fast, so you can make multiple copies of your slideshow.
By following the simple steps outlined in this guide, anyone can easily create DVDs containing their favorite slideshows, providing a tangible and enduring way to relive cherished moments or convey important information.
So, if you want to keep photos and videos safe and sound, create DVD slideshows. You will be glad you did!

Tech Writer and Photography Aficionado
